This blog is about installing metal roofing.
More complicated metal roofing jobs – of a residence, with a lot of peaks and valleys, at a great height- are jobs for qualified professionals. But putting a simple metal roof on a one- story building is very doable for the handy and the relatively sure- footed.
Here’s a walk- through project, sharing some basics and tricks that a non-pro can use to get more professional looking results.
First, a disclaimer
Installing metal roofing can be risky. Anything on a ladder and more than a foot above ground can mean danger and isn’t for everyone. Add in handling sheets of 3-foot-wide metal and the danger factor can grow even more.
DIYers proceed at your own risk. But with all that said, installing a metal roof on small and medium-sized buildings is a project that we know we can tackle and that we’re getting pretty good at.
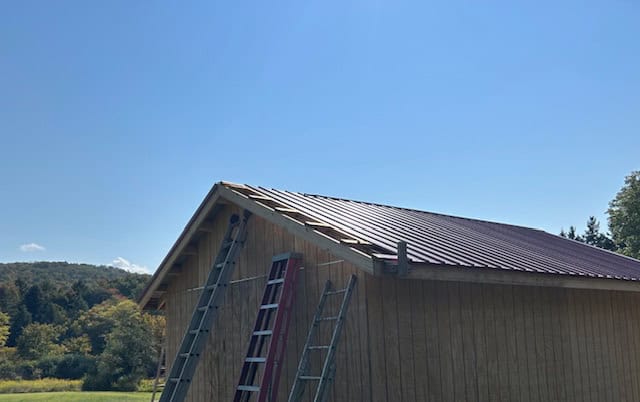
A metal roofing example: The water shed
The water shed is what we affectionately call a 16 by 24-foot building that houses our cabin cluster bathrooms and showers. It will eventually be expanded to include an outside kitchen and additional facilities but for now it’s big enough for the basics.
This is a walkthrough of how we roofed it.
(Note: We decided to keep the overhang and the interior of the building wide open. A few well-placed vents and closing the water shed down in winter months make condensation and vapor barriers a non-issue for this roofing project.)
Installing rafters
There is a ton to know about calculating, cutting, and installing rafters.
Here are some quick basics we needed to know for the water shed project:
- Slope
- In general, a 3:12 pitch would be our minimum for a metal roof. That means for every 12 inches the roof runs it would rise 3 inches. We’re thinking about snow loads, water shedding, and looks. For the water shed we went a little steeper with a 5:12 pitch.
- Span
- There are span tables to refer to when deciding the dimensions of your rafters. We went with 2 by 6s, which can run up to 16 ft 4 inches at our slope. From peak to outside walls we were at just under ten feet so 2 by 6s were more than enough.
- Eaves
- This is the overhang where the water sheds off the roof. A distance of 12 to 18 inches beyond the walls is recommended in order to direct water away from walls and windows. Water shed eaves were 18 inches.
- Rakes
- This is the overhang on the gable ends. Creating distance to protect walls and windows is important here too. We went with 10 inches (in general, 8 inches is plenty).
- Rafter Spacing
- We placed rafters 24 inches apart from center to center. This is the maximum allowed and for this project it worked well.
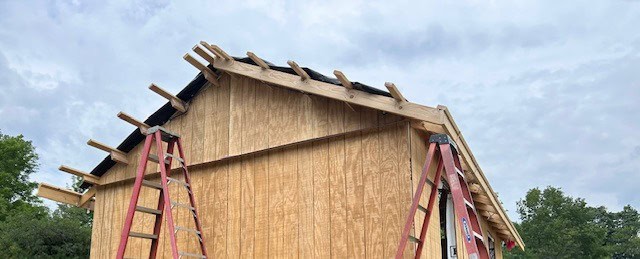
- Installation tip: we cut spacers 14 ½ inches long for between the rafters. These were placed flush with the outside of the walls on the eaves sides (see pic below). We ripped the tops so the top angle lined up with the tops of the rafters.
Fascia board
When the rafters were in place we fastened a 2 by 6 along their ends as a fascia board. It was important to remember the downward slope of the roof so the metal didn’t ride up on the fascia. We temporarily screwed 2 by 4 scraps to the tops of a few rafter ends to install the fascia at the perfect height.
We also made sure that the fascia boards extended past the rake sides of the building by sixteen inches. This gave more than enough material to work with when it came time to add the overhang to the rake sides.
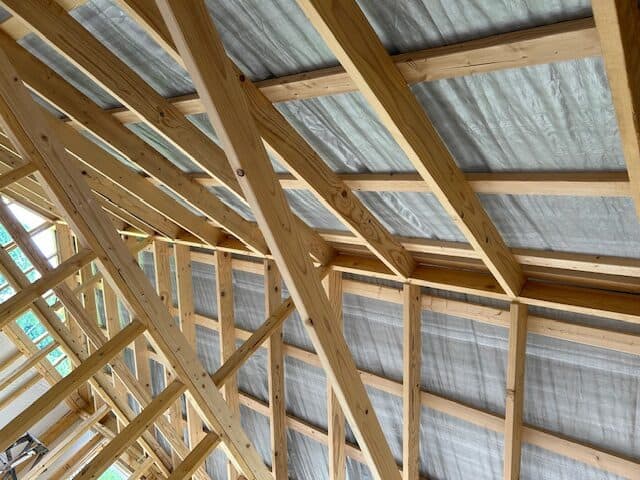
Purlins!
This was our favorite part! This was when a very cool checkerboard pattern was created and when everything became sturdier. We used 2 by 4s for our purlins. They ran horizontal with the peak, two feet o.c. except for at the peak and at the eaves.

Proper spacing of purlins and of rafters is extremely important for roof integrity – to prevent sagging and structural issues.
Starting at the bottom, we attached the first purlin to the top of the fascia board. We let it hang over by ¾ of an inch (to extend the roof beyond the fascia board just a little more).
Like the fascia, purlins needed to extend beyond the rake walls by 16 inches. The longer the purlins the better things tied together so we used 16 footers and 12 footers where we could. We also didn’t use any short lengths at the ends of rows.
The next purlin went directly above the outside wall right above the rafter spacers.
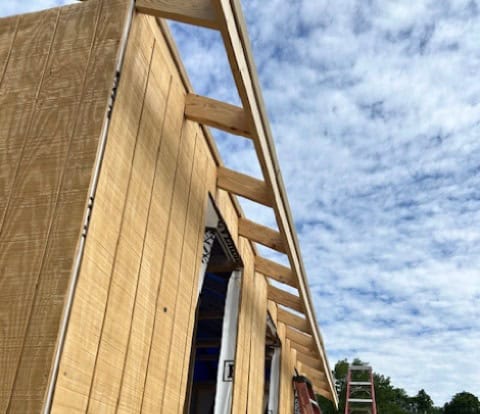
Building the purlin ladder
Cutting a few 2 by 4 spacers 20 ½ inches long (to have purlins that were 24 inches o.c), we installed row after row until we were less than 2 feet from the peak.
This was an important time to think about eventually installing the metal ridge cap. Our cap was 10 inches wide, so the top purlins center need to be 5 inches from the peak in order to have something to screw the edges into.
Building the rake overhang
To create a 10-inch overhang we cut 8 1/2” lengths of 2 by 6 and added them to the bottom of the overhanging purlins (making a T shape). We used screws to make assembling easier and tighter. Then we chalk lined the top of the purlins 10 inches from wall and cut them off.
After that we added 2 by 6s as fascia. (8 ½” plus the 1 ½ “ wide fascia gave us our 10”).
Installation tip: Fascia took a few trial runs. We cut the angle for the lower ends, butted them against the eaves fascia, then held the rake fascia in place with a couple of screws. We marked the top length at the exact center of the peak and used a torpedo level to mark the perfect angle. A pro might not have needed to do this, but there were a lot of variations and we wanted things to line up exactly. We held up and marked the fascia on the other side and ended up with a perfect fit.
We cut off the long eaves fascia and went on to the next step.
Time to buy the metal roofing
We’re always glad we’ve put off ordering our metal until this point. We can get a final measurement of the framework and know exact lengths. Sheets come in standard widths (we use the 36 inch wide) and are cut to custom length.
We measured from a couple inches down from the peak to the outside edge of the purlin above the fascia. Then we added 1 1/2 inches for overhang.
Our shopping list:
(Shout out to Armor Building Supply in Canandaigua NY and Hornell NY. They’ve always been great to work with!)
- 29 -gauge galvanized steel roofing panels. (This is the thinnest, lightest and most affordable and does the job well. 29-gauge is suitable for most projects and is the most commonly used.)
- Drip edge- the length of the entire eaves
- Rake edge –the length of the rake edges
- Ridge cap – the length of the entire peak (Drip edge, rake edge, and the ridge cap come in 10 foot sections. We’re glad we ordered a little extra!)
- Screws – self tapping screws with rubber washers – painted the same color as the roof.
- Inner and outer closure strips – foam pieces that come in 3-foot lengths and match the contours of metal roofing. They close off drafts and deter bugs and rodents.
Metal roof panel install – step by step
Step 1 – picked a side and put on the first drip edge – a few roofing nails to hold it in place.
Step 2 – lined up the first sheet – Took our time to get it right with a 1 ½ overhang on the eaves and the edge lined up with the rake.
Remembered long edges of sheets aren’t the same – one side is slightly fatter and meant to go over the top of the other. We put the fatter side at the outside edge of the roof.
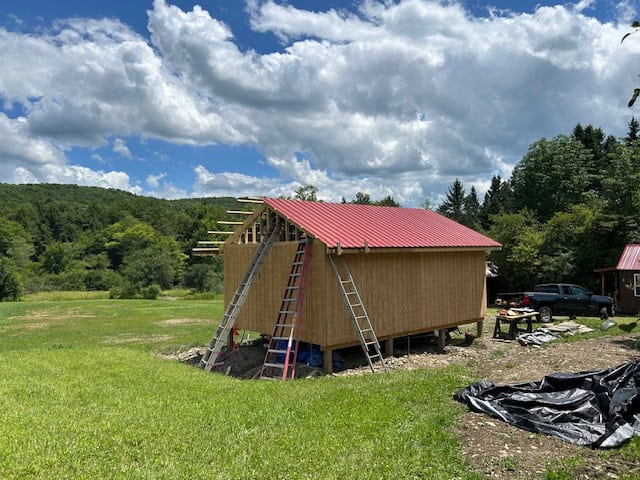
Installation tip: We built braces to keep the sheets from sliding off the roof – looked like lower case t’s made out of 2 by 4. The horizontal piece was bolted to the fascia with large Headlock wood screws and the vertical piece kept panels from sliding.
Step 3 – We marked screw locations: Metal roofing screws are self-tapping but we think its way easier and neater to predrill holes while on the ground. We put the first piece in place temporarily on the roof and marked the center of each purlin with a pencil. Then we carried the metal back down, mark the rest of the holes (perfect rows, on the flat part of the metal, between every other rib). Then we stacked all the full sheets we needed for one side under the marked sheet and drilled all of them at the same time.
Step4- Put the first sheet back up, put the inner closure strip above the eaves wall and below the metal, and screwed the sheet in place. (Screw washers should be squished slightly but not too squished). Moved the brackets down, put up the next panel, overlapped the first and last ribs, slid in the inner closure strip and screwed the panel down.
There’s some give to the sheets, and they can be stretched slightly like an accordion. We can stretch the top or the bottom a little to keep things lined up. We screwed from one side to the other to avoid bulges in the metal.
Being careful to keep a uniform overhang and adding on more drip edge when needed, we repeated the process across the roof.
How we cheated to make things line up perfectly
When they’re a few sheets away, professionals start measuring to the far wall and stretch the top or the bottom of the metal sheets so that things line up perfectly. On one side of the roof we forgot to do that and we were headed for a crooked ending. Here’s how we solved it:
We adjusted the dimensions of the rake ladder (which no one will ever notice).
We cut the width of the last sheet in a straight line, as close to 10 inches beyond the wall as we could get it.
We put the sheet in place temporarily and marked the edge of the sheet on the purlins. We took down the metal, cut the purlins, and added 2 by 6 supports 1 1/2 inches shorter than the purlins. A very slight variation in overhang was far less noticeable than a crooked ending of the row of metal roofing.
Like on the other end, fascia was added, the fascia on the eaves side was cut off, and the metal was put in place. It looked perfect!
Finishing Up
We added the rake moldings (cutting a custom piece at the peak) and then added the ridge cap – both required custom cutting and bending to finish off the ends nicely (maybe a topic for another blog).
Installation tip: Rake edge moldings are L shaped and wrap from the fascia onto the roof. We were careful not to put any screws on the roof under where the moldings wanted to lay.
Installing the ridge vent took some work. The exterior foam closures were put on, the cap was put on over them and then screwed into place.
Some work was done off a ladder. Some was done by straddling the peak, and some was done when hanging onto a secured canvas tow rope that ran over the top of the building. Screws went through the cap and into the tops of every other panel ridge (longer screws were needed for this).
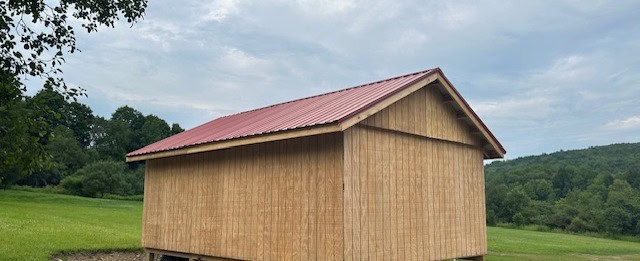
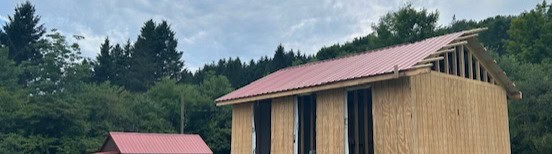
We love the way the water shed metal roof turned out (windows, porch, etc. were added later on).
It will last up to 80 years if all goes well. We also saved a ton of money (the metal cost $1,020) by doing the work ourselves, and we do a professional looking job, if we may say so ourselves.
If you do decide to take on a metal roofing project, please be safe, and reach out to a qualified professional if needed. You will also want to follow building codes in your area and get required permits.
We hope you’ve found information you can use here, and we’d love to connect via our Contact page and hear your thoughts.
Happy Roofing!