When we first started our glampsite, we focused on the basics: making a beautiful spot in nature, adding trails, making the perfect campfire area, and building two camping cabins with all the creature comforts.
But over time, it became clear that one upgrade would take things to the next level—not just for guests, but for us too.
That upgrade? A fully functioning bathroom.
Not just a porta jon (I own one!) or outdoor shower from a sun heated bag(though those can be great too), but a real bathroom with running water, a flushing toilet, a sink, and even an indoor and an outdoor hot shower.
We wanted something rustic but with all the amenities. After our first full season, we knew that, if we were going to grow and host seriously, real bathrooms were a must.
If you’re thinking about doing the same, this post is for you. I’ll walk you through how we built a bathroom from scratch at the glamping campsite, including:
- Digging a well
- Installing a septic system and leach field
- Building the bathroom structure
- Lessons learned, what I’d do differently
Let’s dig in (literally).

🔧 Step 1: Planning, Permits, and Research
Adding plumbing to a rural property isn’t something you can do on a whim—especially if you’re hosting paying guests and need to be 100% certain there are no health risks. We had to start with permits and planning, which turned out to be a learning curve in itself.
What was Needed:
- A site plan showing proposed locations for the well, septic tank, and leach field. This was done with the help of the county health department, the DEC ( to delineate wetlands), and the building inspector.
- A perk test (soil evaluation) to confirm the land could support a leach field. Ours didn’t leach (a ton of clay) so that meant trucking in ALOT of stone.
- Approval from the local health department. The health department designed the leach field system and worked closely with our contractor. They were a huge help!
- A licensed contractor for septic and well installation (required in most counties).
💬 Pro tip: Call your local health department first. Every region has different rules, and it’s much easier to get clarity up front than to backtrack later.
This phase took a few weeks, to coordinate schedules and have permits drawn up. Code changes quite a bit when more overnight guests are a possibility. We went with the larger leach field, giving room for additional guests, and maybe even a crowd if used as an event space in the future.
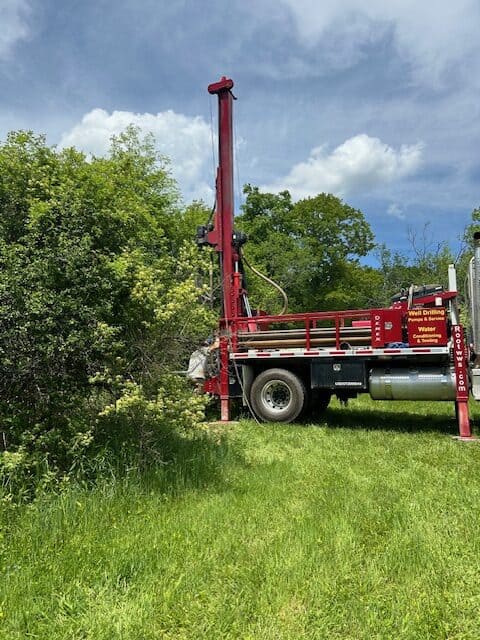
💦 Step 2: Digging the Well
Once we had approval, it was time to get water on-site. Root Water Well came highly recommended and we weren’t disappointed. The foreman seemed almost as happy as I was when they hit water at forty feet. I stood behind the rig and let the water from the well hit my face. It was an amazing feeling!
The Details:
- Depth: 40 feet (this will vary based on your geology- we were very lucky to hit quality water at such a short depth)
- Type of Pump: Submersible electric pump with a pressure tank system. The well was dug uphill from what would become our Water Shed, and the leach field was below that.
- Cost: About $7,500 including drilling, casing, pump, and tank installation
- The drilling company took care of all required paperwork
The pump and pressure tank were buried well below the frost line. The system was designed for water to drain back into the well when not in use, helping a ton with any freezing issues.
🚽 Step 3: Installing the Septic System & Leach Field
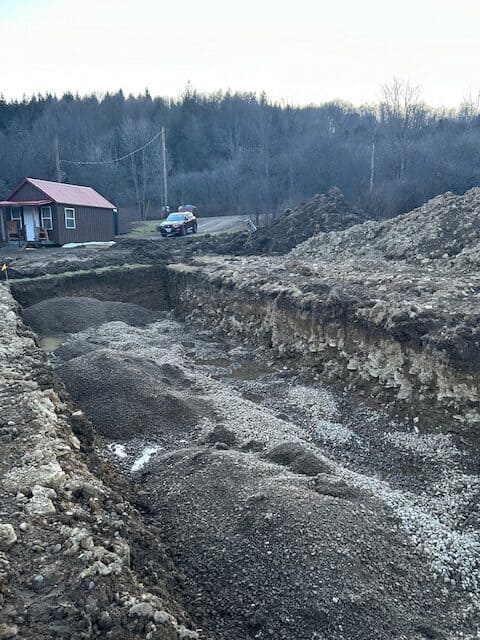
Next came the leach field. This is basically a network of perforated pipe. A large pit is dug and pipes are added along with stone. Excess water is piped away to a drainage mound, where the filtered water returns to the environment. Supposedly this water is clean enough to drink, but… yuck.
Installation Breakdown:
- Tank: 1000-gallon plastic septic tank
- Leach Field: Multiple trenches with perforated pipe, gravel, and geo-textile fabric
- Location: Placed downslope from the cabins and bathroom facilities for safety and gravity flow
- Contractor: Required to be licensed and inspected by the county
- Total Cost: Around $15,000 for everything (excavation, tank, pipe, backfill, etc.). This included putting in footers for the eventual Water Shed and 50 feet of culvert pipe
📸 If you’re documenting your own journey, take plenty of photos during this step—you’ll thank yourself later for insurance and records.
🏡 Step 4: Building the Bathroom Structure
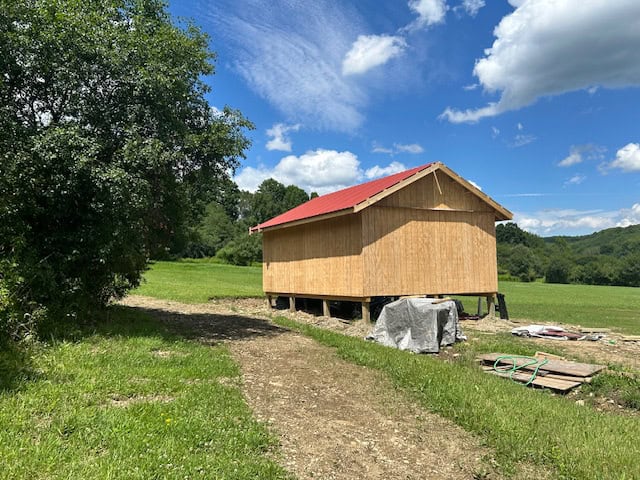
With the well and the leach field in place, next on the list was a place to put it all in. We put up a 16 by 24 building, opting to have it on piers for speed of build and for ease of plumbing installation.
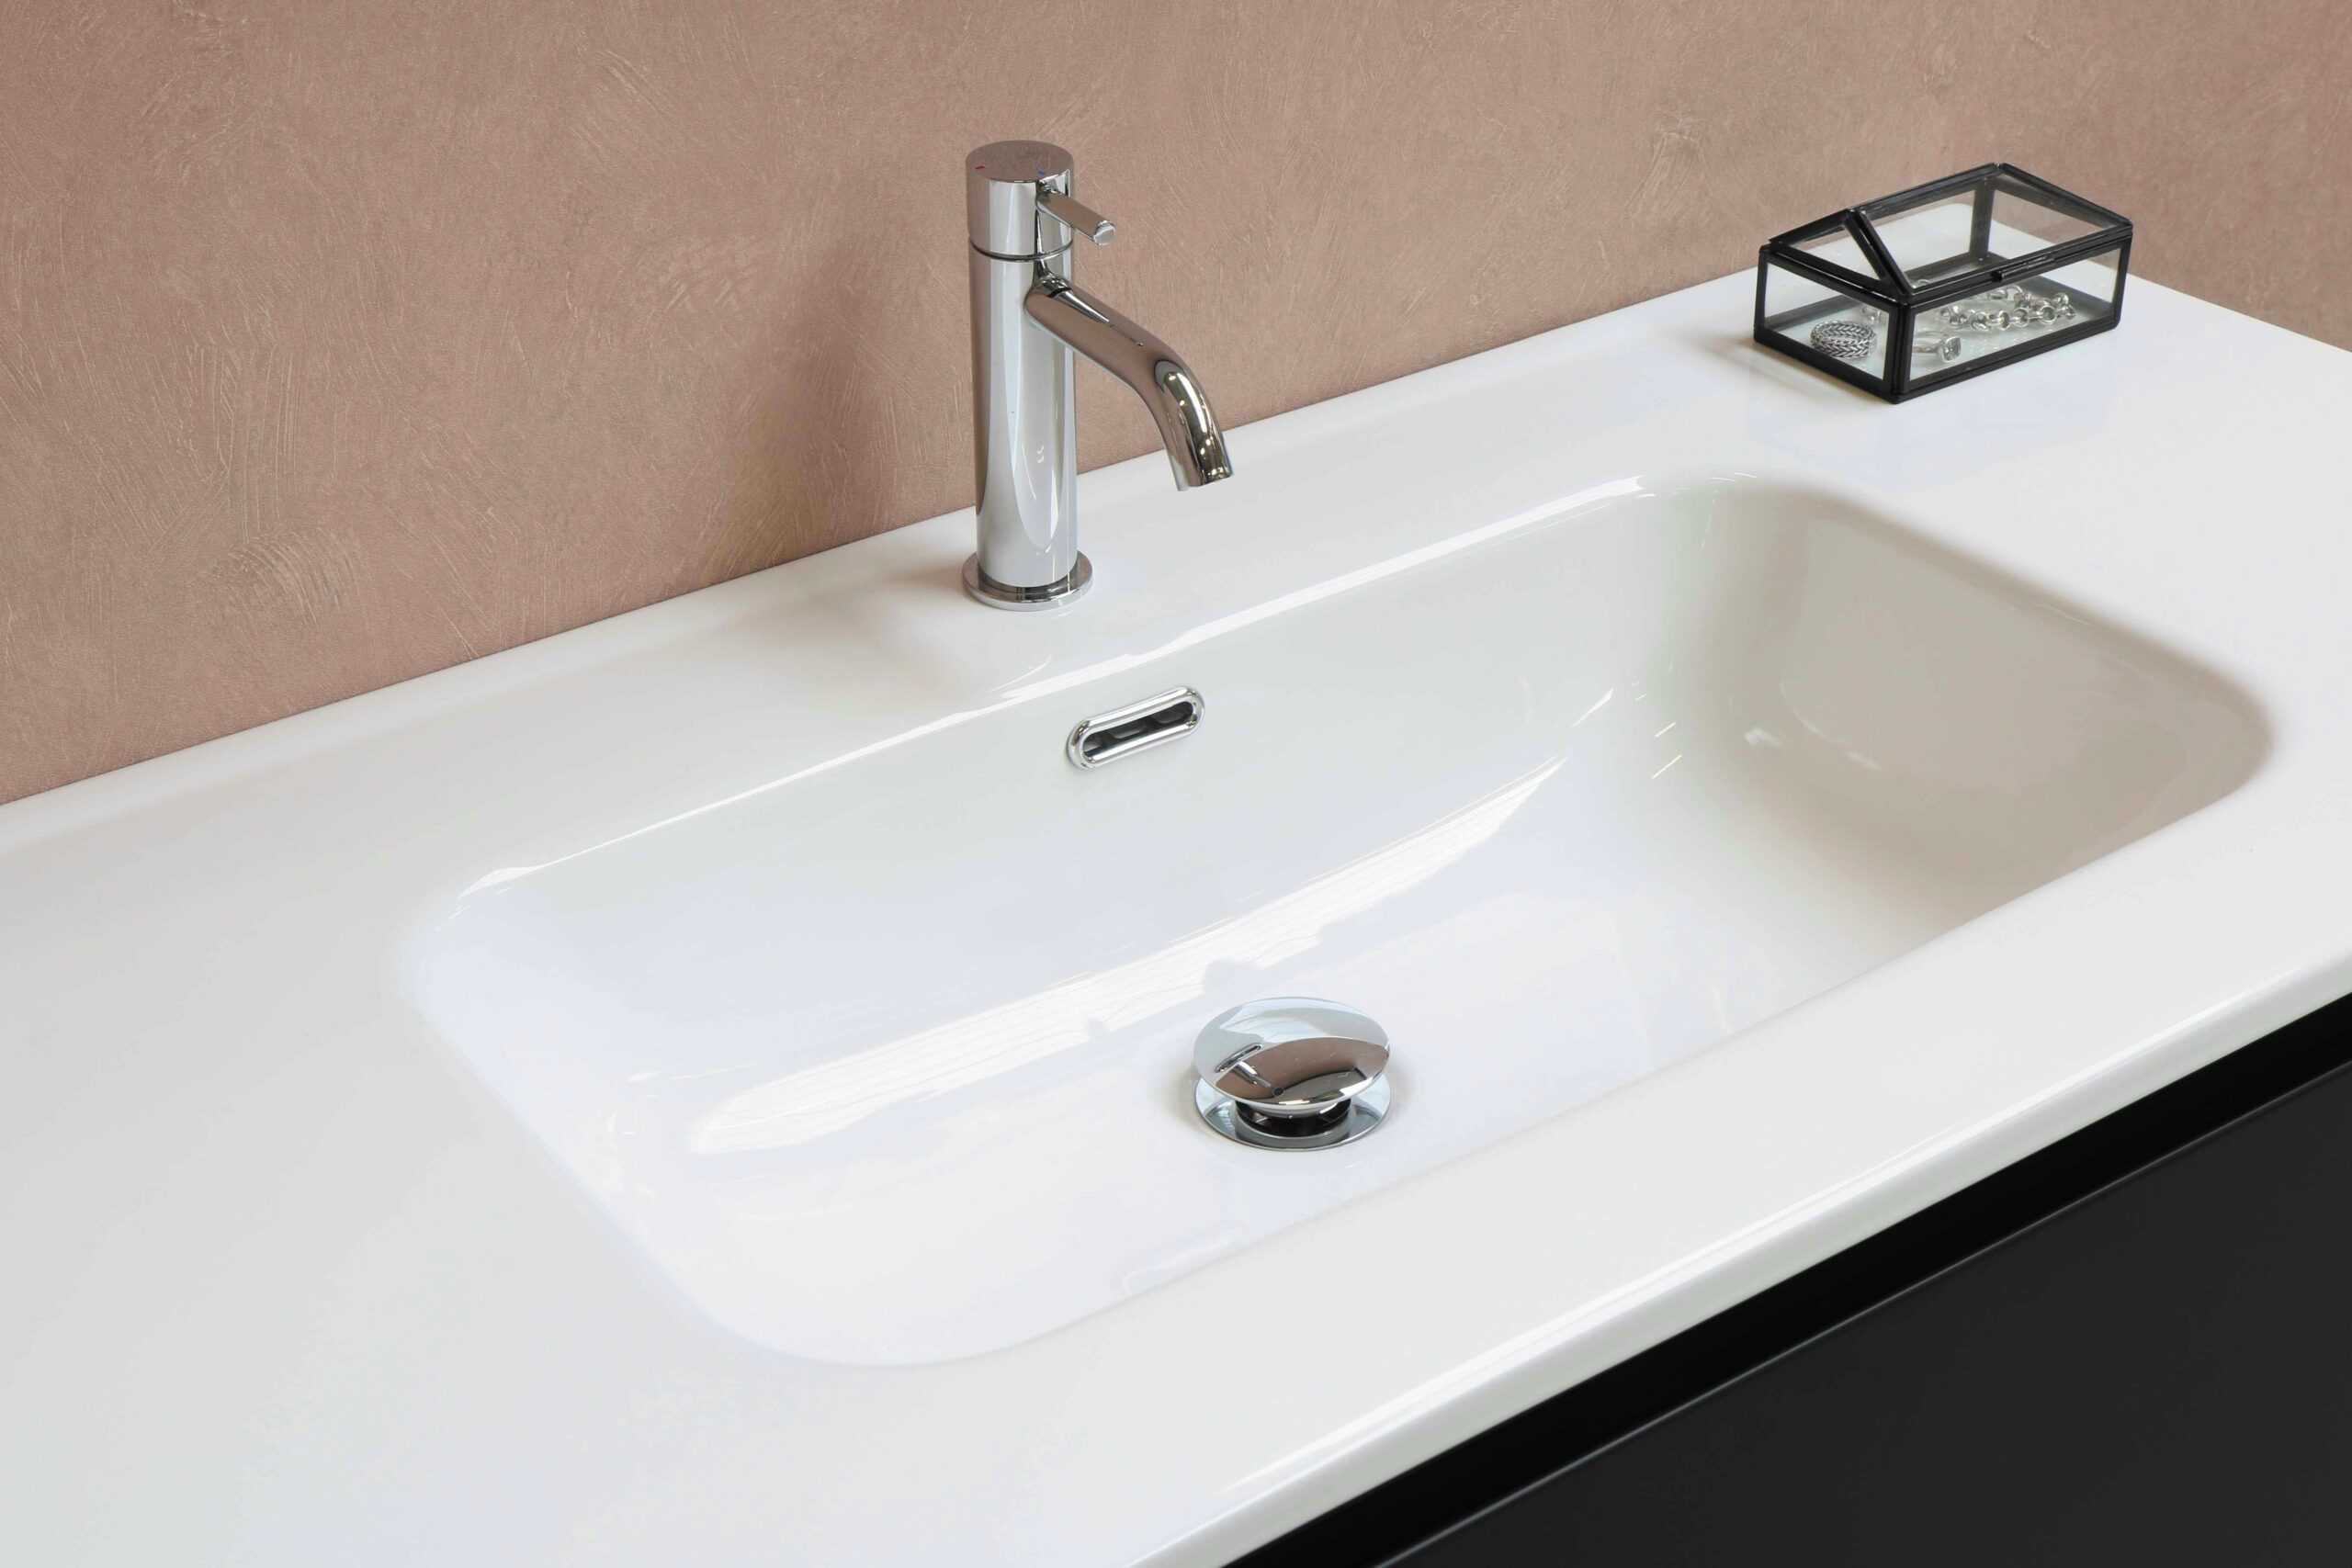
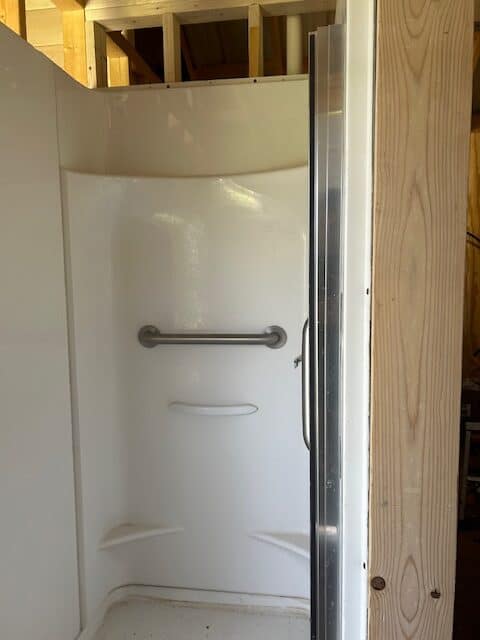
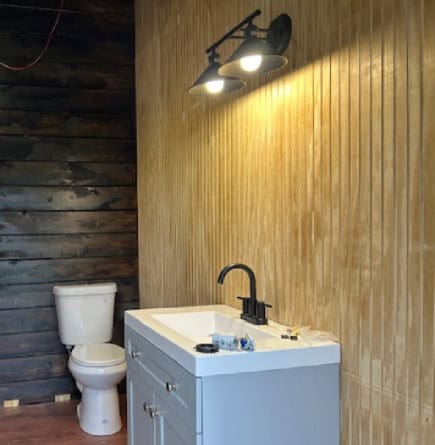
The building is divided into three sections. One is a lockable shower room. Another is a bathroom with two toilets and a sink (all of which are requires when overnight guests exceed 25 people). The third section is being used for storage but will be easily convertible to another bathroom when the time comes.
Materials & Design:
- Structure: Wood frame, T1-11 siding, metal roof
- Insulation: No(the plan is for this building to be closed and winterized in colder months).
- Windows: One window for light and ventilation in the bathroom and in the storage area (added after this photo)
- Doors: Three identical doors running along the long side of the building
- Flooring: Pergo style in the bathroom. Ceramic tile (coming soon) in the shower room.
Plumbing Setup:
- Toilets: Two standard gravity-flush models
- Sink: Small basin with wall-mount faucet
- Shower: Corner shower with waterproof walls in its own room
- Hot Water: Electric – 40-gallon tank
- Ventilation: passive vent near the roofline and electric bathroom
vents in each room💬
(photo -still under construction!)
🪵 Step 5: The Finishing Touches
This is what makes the bathroom go from “functional” to “special.”
What I Included:
- 13-foot ceiling, to prevent feeling closed in.
- Hooks for towels and robes
- A mirror with storage shelf
- Natural soaps, biodegradable shampoo, and towels
💬 A game changer
The bathroom changed everything.
I took my first real shower at the glamping campsite not long ago and it was spectacular! Flushing toilets also feel like such a luxury.
There is still some finish work to do, but the amenities are ready to go for the season. We will keep the porta jon for use during the winter months.
🔁 What We’d Do Differently
Even though we’re thrilled with the results, there are a few things we’d change if we were starting over:
1. Bargain Hunt
We bought everything new, but with a little more planning we could have been on the lookout for bargains. The price tag added up very quickly, and every dollar saved would have mattered.
2. Build a Larger Structure
The Water Shed is brand new but we’re already wishing it was bigger. Eventually we will add on-maybe an outside covered area- but that will be a next year project.
2. We would have done it sooner
The Water Shed came with a pretty big price tag but it is totally worth it! These new amenities will make all the difference as we forge ahead with our hosting adventures!
✅ Final Thoughts
Installing a bathroom at our glamping campsite wasn’t easy or cheap—but it was one of the most transformational investments we’ve made in the property. It elevates the guest experience, improves hygiene and convenience, and allows us to market our site as a more luxurious getaway.
If you’re thinking of adding a bathroom to your off-grid or rural property, here’s my advice:
- Do your homework. Understand local regulations and what’s actually allowed.
- Work with professionals. Cutting corners on septic or electrical is a bad idea.
- Think long-term. A well-designed bathroom will serve you for years—and open up new hosting opportunities.
Want to do this yourself? I created a free checklist you can download below that covers every step I took. And if you have questions, feel free to reach out—we love helping other glampsite owners build and grow!
📝 Download the Free Bathroom Build Checklist:
[📥 Click here to get the printable PDF]
Photo by Sanibell BV on Unsplash