Let the planning for the geo dome project begin!
Initially this blog was going to be – building a deck strong enough and big enough for a geo dome- but the write up quickly became too cumbersome and complicated. So we’re breaking it down into smaller building steps.
Step 1 is in the dirt – how to tame the ground enough to put up a floating deck and how to build a foundation strong enough to stay up for years to come.
This is step 1 of a 24×24 platform deck — 576 square feet of usable outdoor space. This will be more than big enough for our 5m dome, which has a 16.4 inch radius, along with deck space on the front and side of it.
In step 1 we make a detailed plan for:
- Shaping the ground
- Managing drainage
- Laying stone
- Setting footers
- Leveling posts
- Installing beams
- Making it square
This first step will feel a little tedious but it will be worth it.
The extra attention will result in a deck that will last a couple decades instead of just a couple years.
(note: the graphics are close, but not exact-eg beam and leg dimensions)
Why 24×24? (actually, 23.5 x 23.5)
A 20 x 20 deck is plenty big enough for a 5m dome (size recommended by the manufacturer) but the choice to go with a 24×24 made more sense to us.
First, lumber up to 16 feet is far easier to come by than 20 footers. By using 16 footers and 8 footers to cover the 24 feet (23.5 feet to give some wiggle room), there will be virtually no waste of lumber. Less waste means more bang for the buck. There is also length to stagger for strength.
The extra 4 feet in both directions also means we’ll be building 576 square feet of usable deck space.
This means:
Room for seating.
Room for gathering.
Room to spread out.
Room to frame the view of the creek instead of blocking it.
But a bigger footprint also means that more of a solid base is needed.
Which brings us to the ground.
Step 1: Bulldozer Work
We’ve already had the big stuff cleared from the trail and the deck site and have more finish work scheduled for the spring when there’s less mud. We hired a bulldozer to manage and/or remove:
- Garbage trees (like thornapple) and bushes
- Organic topsoil
- Roots
- Soft spots
The goal was to make a minimal impact on the environment while still creating a user-friendly space.
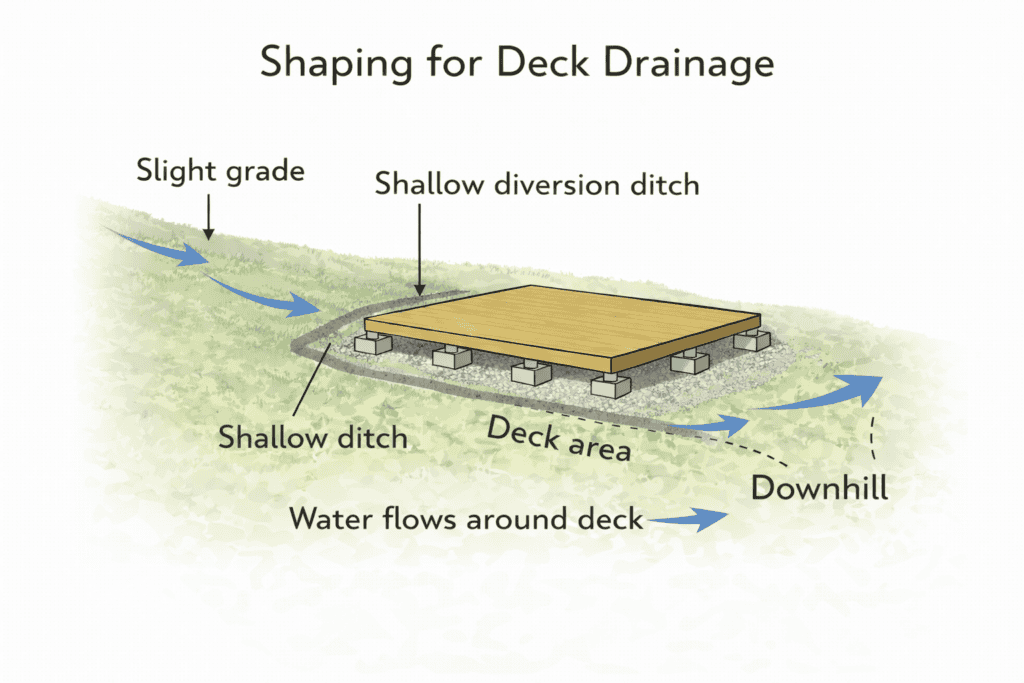
Step 2: Drainage and Ditching — Planning for Snow Melt
In our climate, snow melt can create more water movement than summer storms.
Fortunately, our dozer operator is like a surgeon when it comes to grading and ditching. He makes water go exactly where he wants it – fun to watch it when the water is running fast. And it’s worth every penny.
Water should travel around the deck and not under it.
Standing moisture leads to:
- More biting insects
- Rot
- Frost heave
- Shifting footers
A drainage plan now prevents expensive repairs later.
Step 3: Stone Base
Once grading and drainage are set, we bring in crushed stone for the full 24×24 footprint.
576 square feet of compacted stone creates:
- Drainage
- Stability
- A clean working surface
- Reduced mud splash
- Better airflow underneath
It won’t be seen for the most part once the deck is built but it will protect what’s above it.
Step 4: Laying Out the 24×24 Footprint

Now it gets exciting.
We mark the full 23′ 6″ perimeter using stakes and string lines.
To confirm squareness, we measure diagonals corner to corner.
For a 23.5×23.5 square, both diagonals should measure about 33 feet 2 3/4 inches.
This step is important to avoid being off for the entire build.
Square early. Square often.

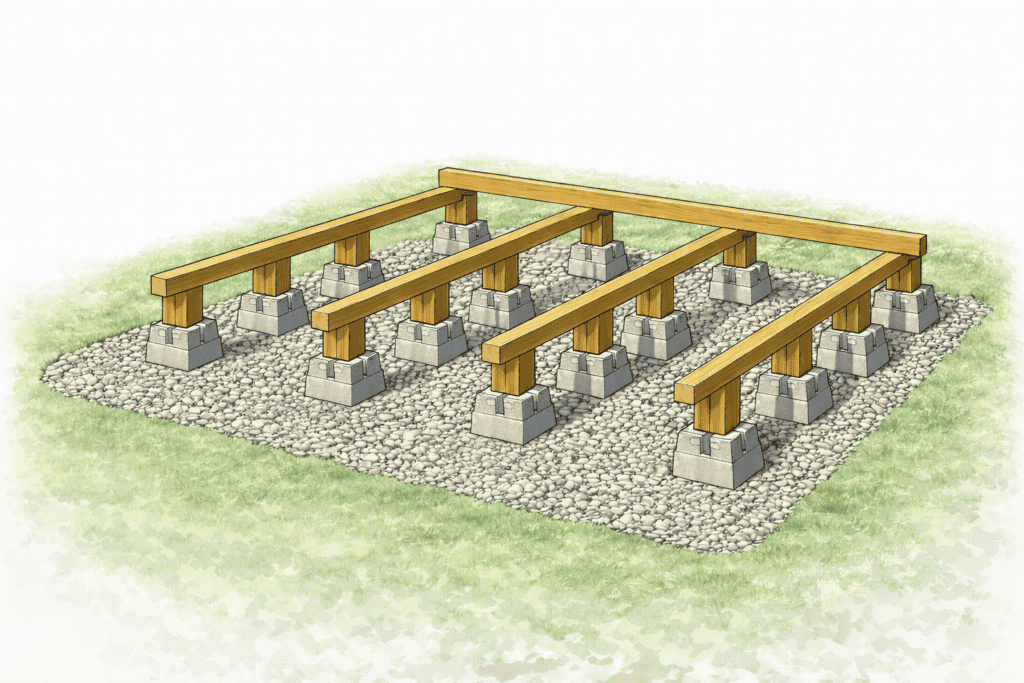
Step 5: Concrete Deck Blocks
For this platform, we lay out multiple concrete deck blocks in four beam lines across the 23.5-foot span.
Each block is:
- Set on compacted stone
- Checked for level
- Aligned with string lines
Spacing depends on beam size and local code, but the principle is simple:
More support = less bounce.
This grid becomes the structural footprint of the entire deck.
Step 6: 4×4 Posts — Cut a Little Long First
We will cut the 4×4 posts long.
Set them in the deck blocks.
Then use a laser level to mark final height.
We’re going with approximately 18″, for ventilation and accessibility under the deck if needed.
Ground is never perfectly even — even after grading.
By marking each post individually with a laser level, you ensure all beams will sit perfectly level.
After marking:
- Remove
- Cut precisely
- Reset
Taking our time with this step makes the rest of the build ALOT easier.

Step 7: Installing the Four Main Beams
With posts trimmed and reset, we install four primary beams running across the 23.5-foot width.
Before fastening permanently, we:
- Check level front-to-back
- Check level side-to-side
- Measure diagonals again
- Confirm alignment
Beams are made up of doubled up 2 x 8s (nailed and glued together). Any butted boards are directly above 4 x 4 legs. HeadLok Screws fasten the beams to the posts.
What a View
Maybe it only looks like 4 parallel balancing beams at this point but it’s an important start.
It will be easier to see what will be here soon, with the creek straight ahead and the pines above.
This is going to be good!
Phase 1 Materials List (24×24)
Quantities approximate — confirm with your layout and local code.
Site Prep
- 3–5 tons crushed stone
Footers
- 16–20 concrete deck blocks
Posts
- 16–20 pressure-treated 4x4x8
Beams
- 12–16 pressure-treated 2x8x12 or 2x10x12
Hardware
- Structural screws or carriage bolts
- Exterior-rated fasteners
Tools
- Laser level
- String lines and stakes
Approximate Lowe’s Pricing (Materials Only)
Disclaimer: Prices fluctuate by region and season. The following are approximate Lowe’s retail prices at time of writing and should be verified before purchasing.
Pressure-treated 4x4x8: $12–$15 each
Pressure-treated 2x8x12: $15–$20 each
Concrete deck blocks: $10–$15 each
Structural screws (box): $30–$40
Crushed stone (delivered): $50–$75 per ton
Estimated Phase 1 Total:
Stone: $300–$500
Deck blocks: $200–$300
4×4 posts: $240–$300
Beam lumber: $240–$320
Hardware: $100–$200
Estimated Materials Total: $1,080 – $1,620
(Not including equipment or dozer work.)
Step 1 isn’t fancy but it is incredibly important for a successful project.
Built level.
Built square.
Water managed intentionally.
And the project is a big step in the right direction.
Happy hosting and happy building!

